Getting Started
That sounds like some simple features to implement so let's get to it.
First install the Atlassian SDK and Oracle Java JDK 8 on your system.
After the installation all the atlas-* commands and java command should be on the PATH variable.
Let's do a short version check of the installed Atlassian SDK tools. I am using a Mac so the output will look a little different if you use another OS.
ATLAS Version:    6.1.0
ATLAS Home:       /Applications/Atlassian/atlassian-plugin-sdk-6.1.0
ATLAS Scripts:    /Applications/Atlassian/atlassian-plugin-sdk-6.1.0/bin
ATLAS Maven Home: /Applications/Atlassian/atlassian-plugin-sdk-6.1.0/apache-maven-3.2.1
AMPS Version:     6.1.2
--------
Executing: /Applications/Atlassian/atlassian-plugin-sdk-6.1.0/apache-maven-3.2.1/bin/mvn --version -gs /Applications/Atlassian/atlassian-plugin-sdk-6.1.0/apache-maven-3.2.1/conf/settings.xml
Java HotSpot(TM) 64-Bit Server VM warning: ignoring option MaxPermSize=256M; support was removed in 8.0
Apache Maven 3.2.1 (ea8b2b07643dbb1b84b6d16e1f08391b666bc1e9; 2014-02-14T18:37:52+01:00)
Maven home: /Applications/Atlassian/atlassian-plugin-sdk-6.1.0/apache-maven-3.2.1
Java version: 1.8.0_45, vendor: Oracle Corporation
Java home: /Library/Java/JavaVirtualMachines/jdk1.8.0_45.jdk/Contents/Home/jre
Default locale: de_DE, platform encoding: UTF-8
OS name: "mac os x", version: "10.10.5", arch: "x86_64", family: "mac"
Now check if Java is correctly installed.
Ok once you got all that set-up we can start.
Creating the base project
We will now create the JIRA Plugin via the Atlassian SDK command atlas-create-jira-plugin. Change to a folder where you want to create your Plugin.
You will be asked to specify a groupId, artifactId, version and package. You can see my choices below.
Now the command should have created a folder called like the artifactId, in our case kitchen-duty-plugin.
pom.xml and custom packaging via atlas-package
the SDK builds an OSGi Plugin bundle in form of a jar file.
Open Project in Java IDE
Use your favorite Java IDE to open the project. I use JetBrains IntelliJ IDEA since it is just awesome. If you want to use Eclipse it is fine with me but all the screenshots will be done with IntelliJ.
Once you have it opened we need to create 3 files for better usage with git and to tell the IDE how we want our indentation.
Create .editorconfig and add statements for line endings, charset and tab indentation. Since IntelliJ is awesome EditorConfig Plugin is already installed. If you are using another IDE get the plugin now.
# EditorConfig is awesome: http://EditorConfig.org
root = true
[*]
end_of_line = lf
insert_final_newline = true
charset = utf-8

[*.html]
indent_style = space
indent_size = 4

[*.js]
indent_style = space
indent_size = 4

[*.css]
indent_style = space
indent_size = 4

[*.xml]
indent_style = space
indent_size = 4

[*.java]
indent_style = space
indent_size = 4

[*.vm]
indent_style = space
indent_size = 4
Create .gitignore and add ignore statements for files we do not want to commit.
.idea/
*.iml
*.log
target/
Create .gitattributes and set line endings to unix.
*.svg eol=lf
*.html eol=lf
*.js eol=lf
*.css eol=lf
*.scss eol=lf
*.json eol=lf
*.sh eol=lf
*.yml eol=lf
*.md eol=lf
*.txt eol=lf
*.java eol=lf
*.properties  eol=lf
*.xml eol=lfEdit pom.xml and add line <version>3.3</version> to maven-compiler-plugin.
<plugin>
    <artifactId>maven-compiler-plugin</artifactId>
    <version>3.3</version>
    <configuration>
        <source>1.7</source>
        <target>1.7</target>
    </configuration>
</plugin>
Also add in the pom.xml right before the closing </dependencies>.
<dependencies>
   ...
   <dependency>
       <groupId>com.atlassian.sal</groupId>
       <artifactId>sal-api</artifactId>
       <version>3.0.3</version>
       <scope>provided</scope>
   </dependency>
</dependencies>
Now open Preferences in IntelliJ and set the built-in maven of the SDK together with the settings.xml
(Tip: By calling atlas-version all paths including home directory of SDK are printed)
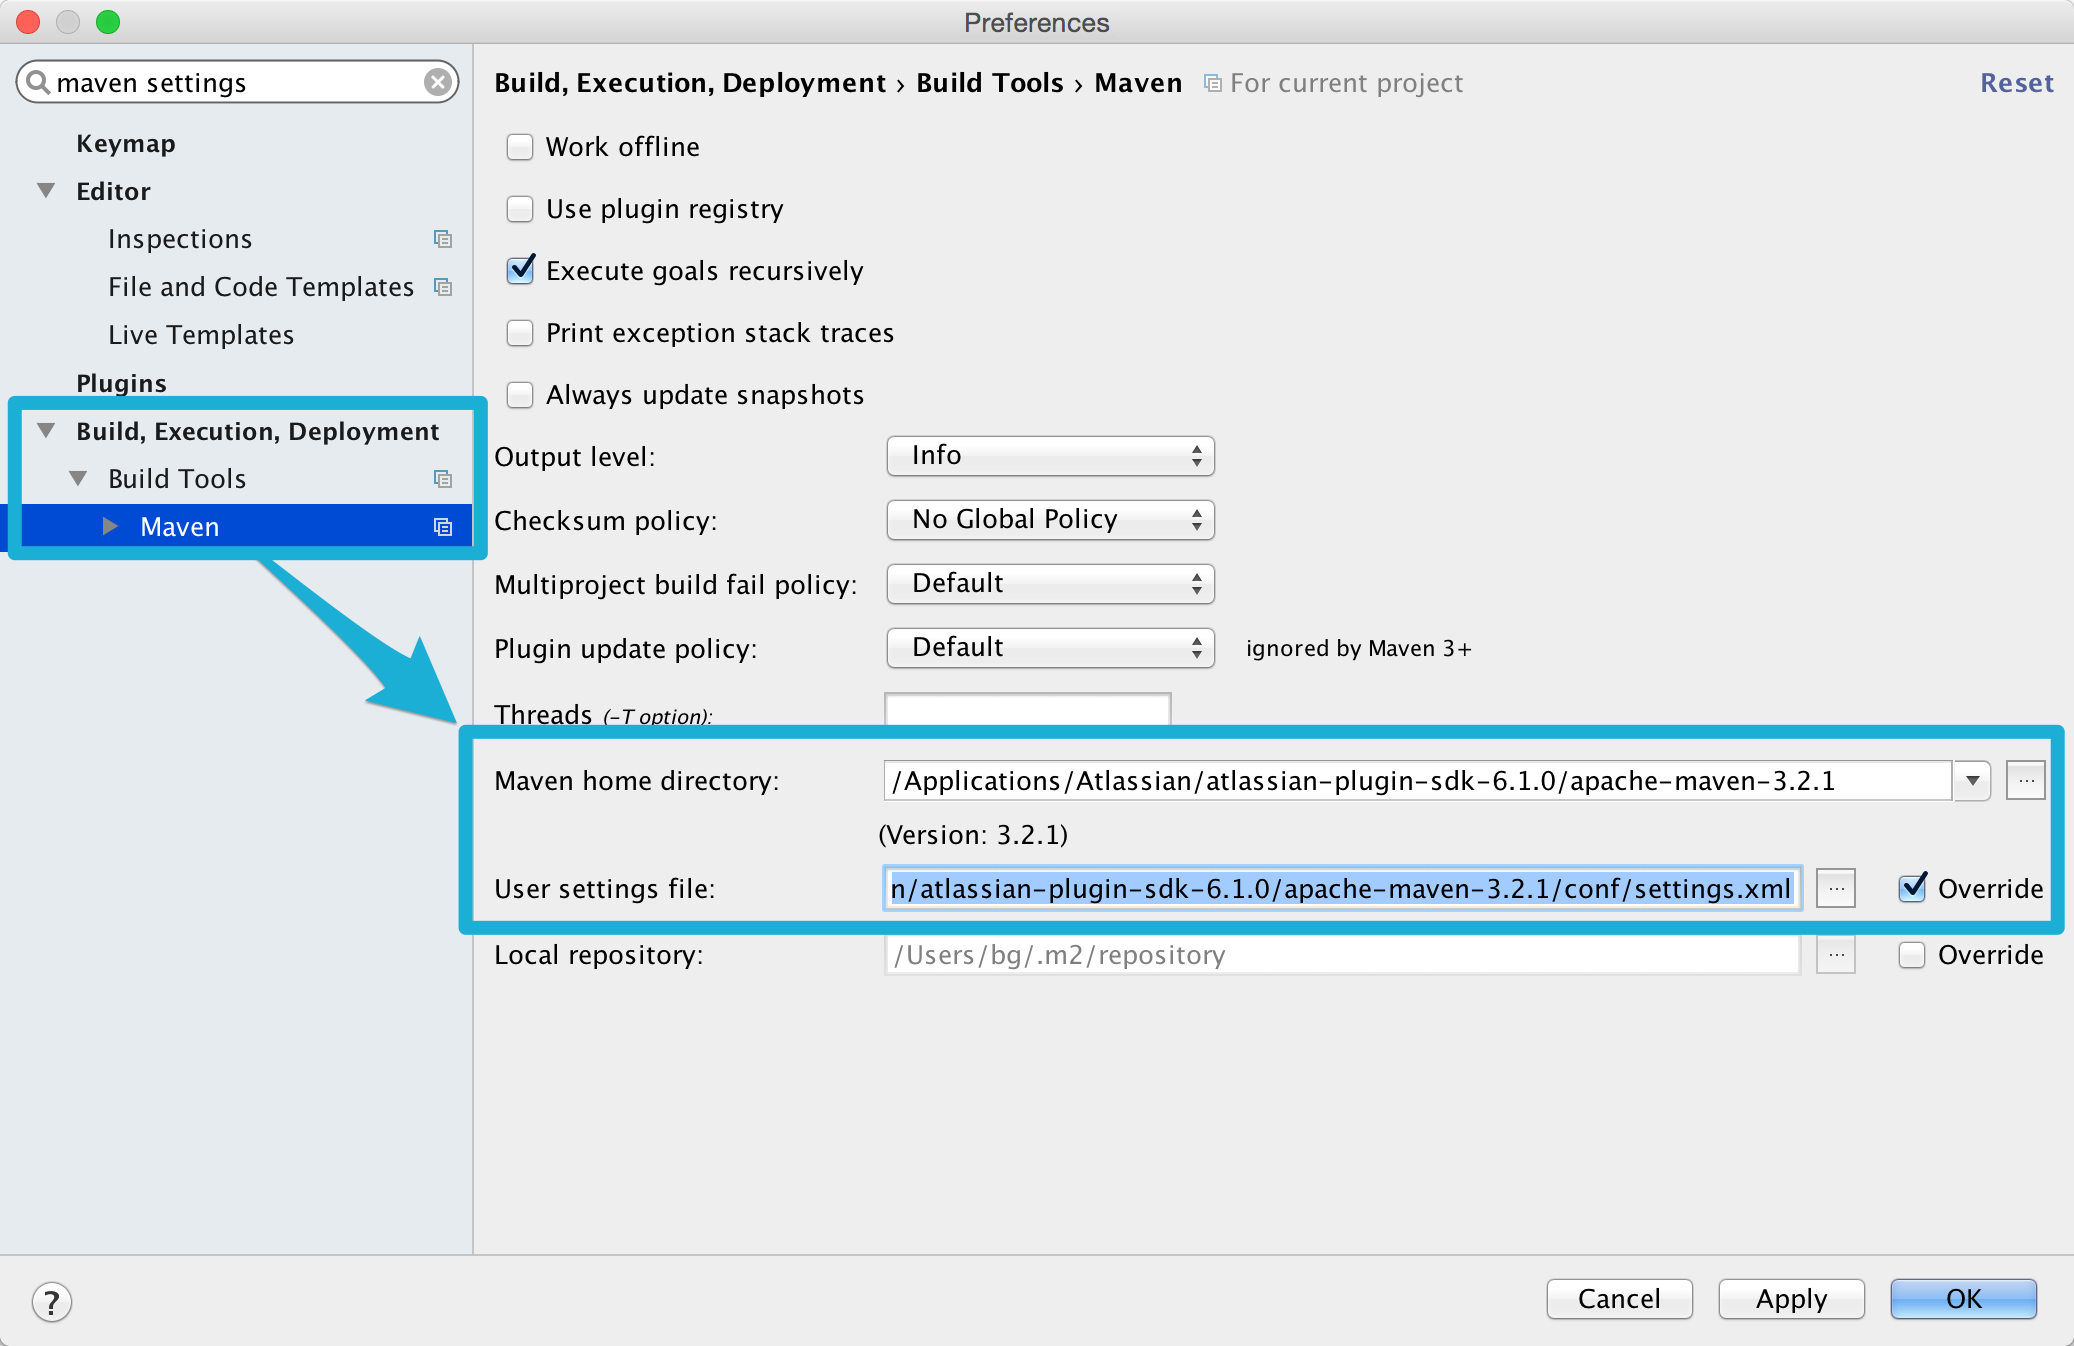
Since we need the ATLAS_HOME environment variable to get maven inside IntelliJ to work we set that as well.
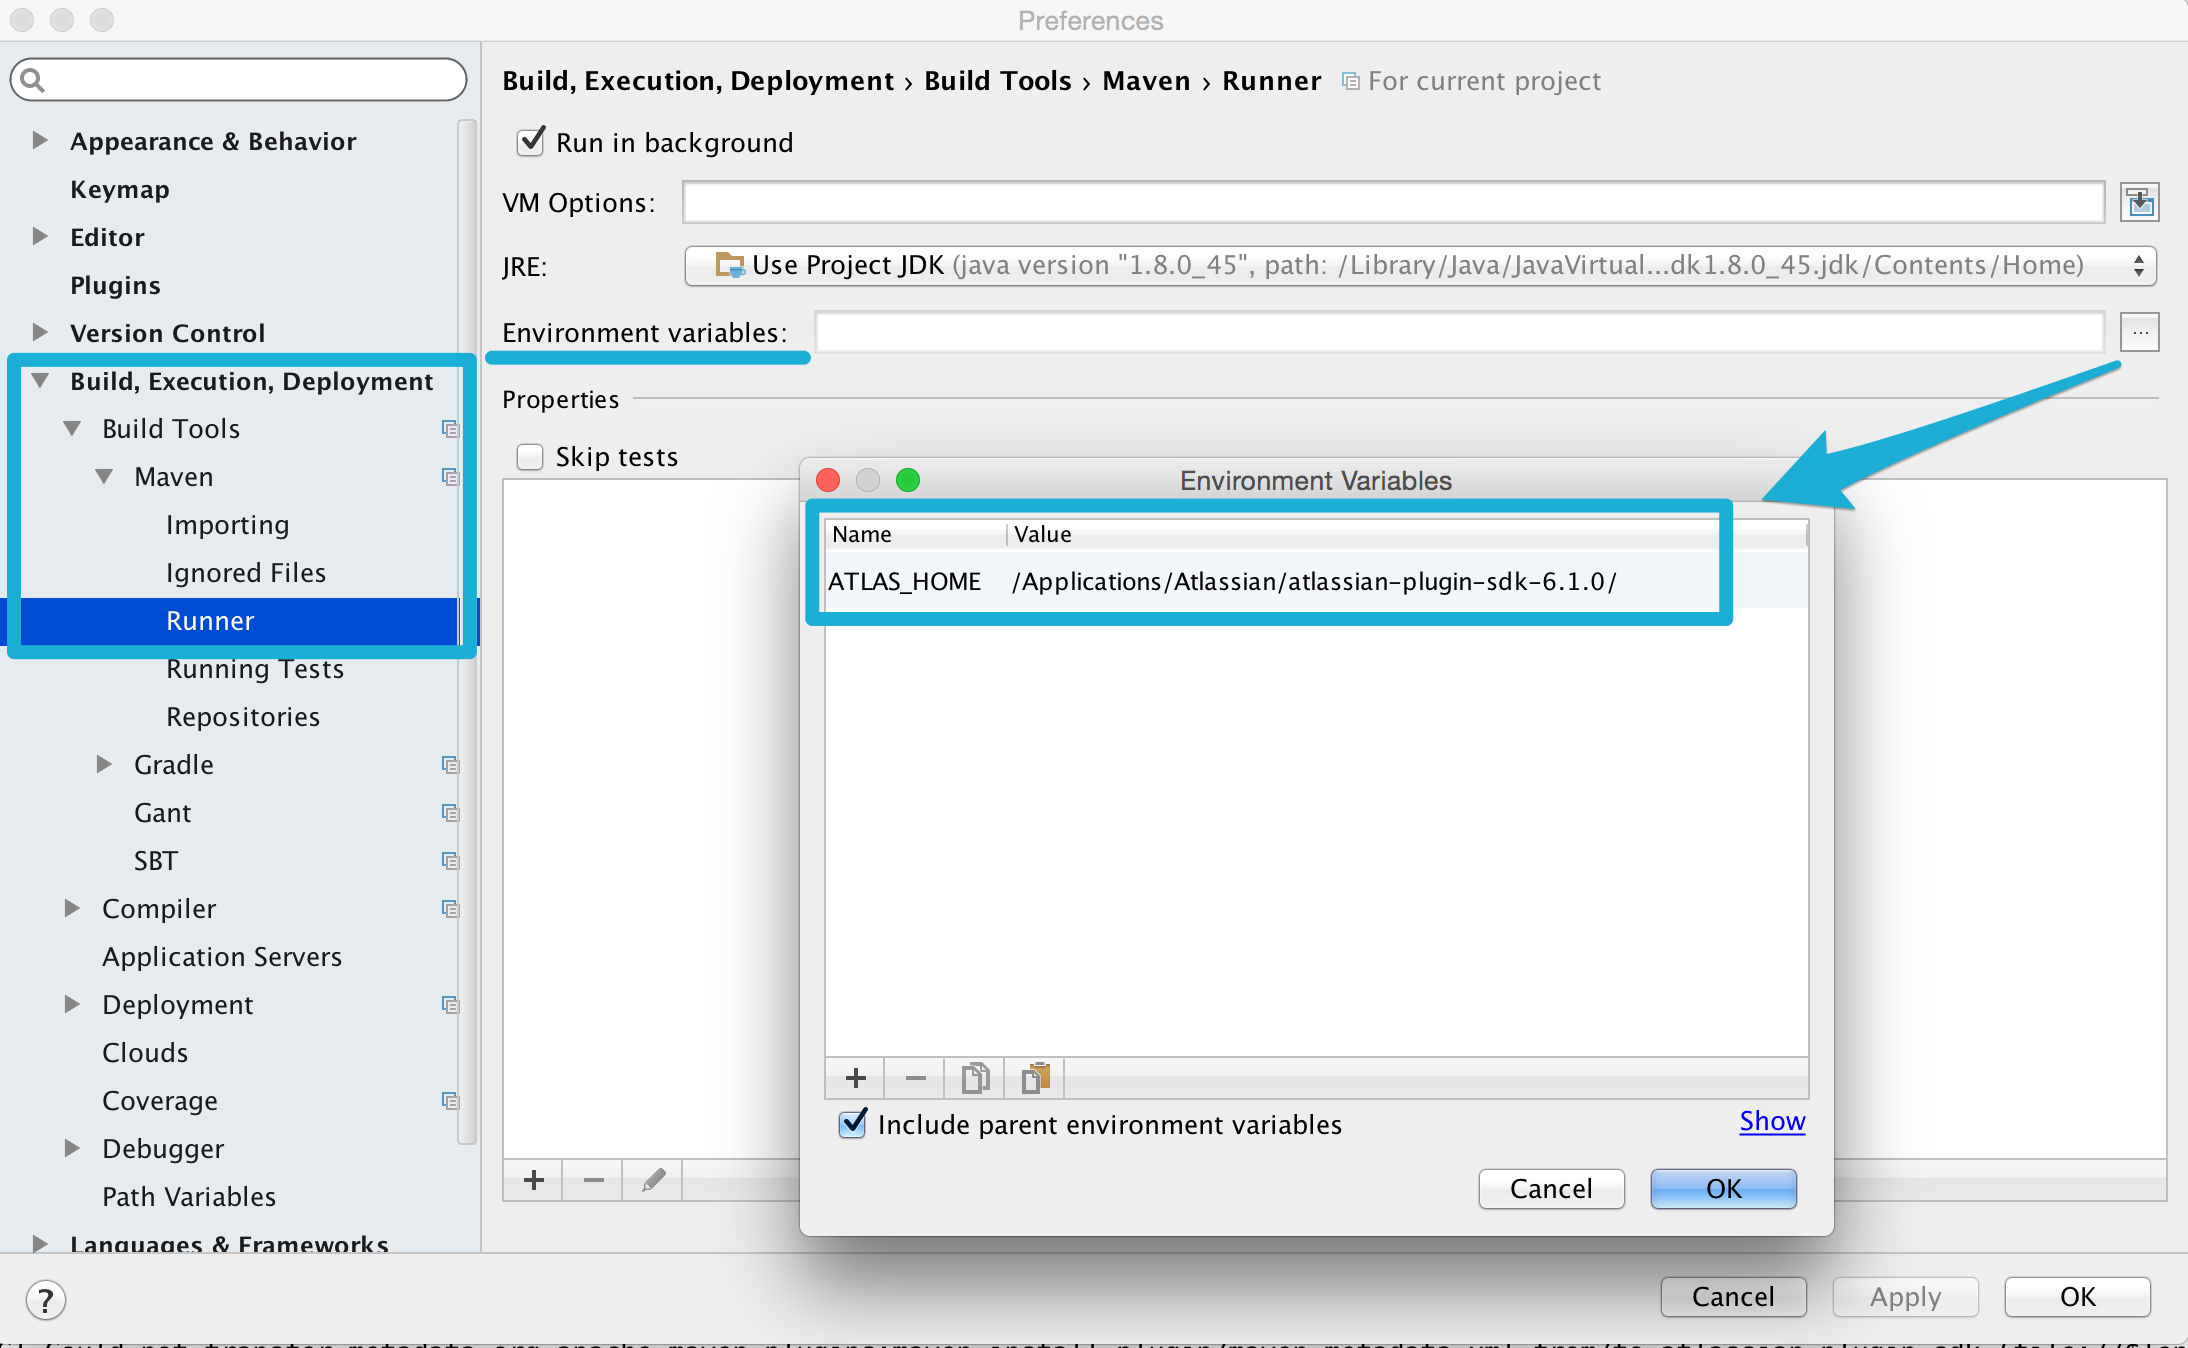
Now you can click on the Maven-Tab on the right and click compile and you should have a successful build.
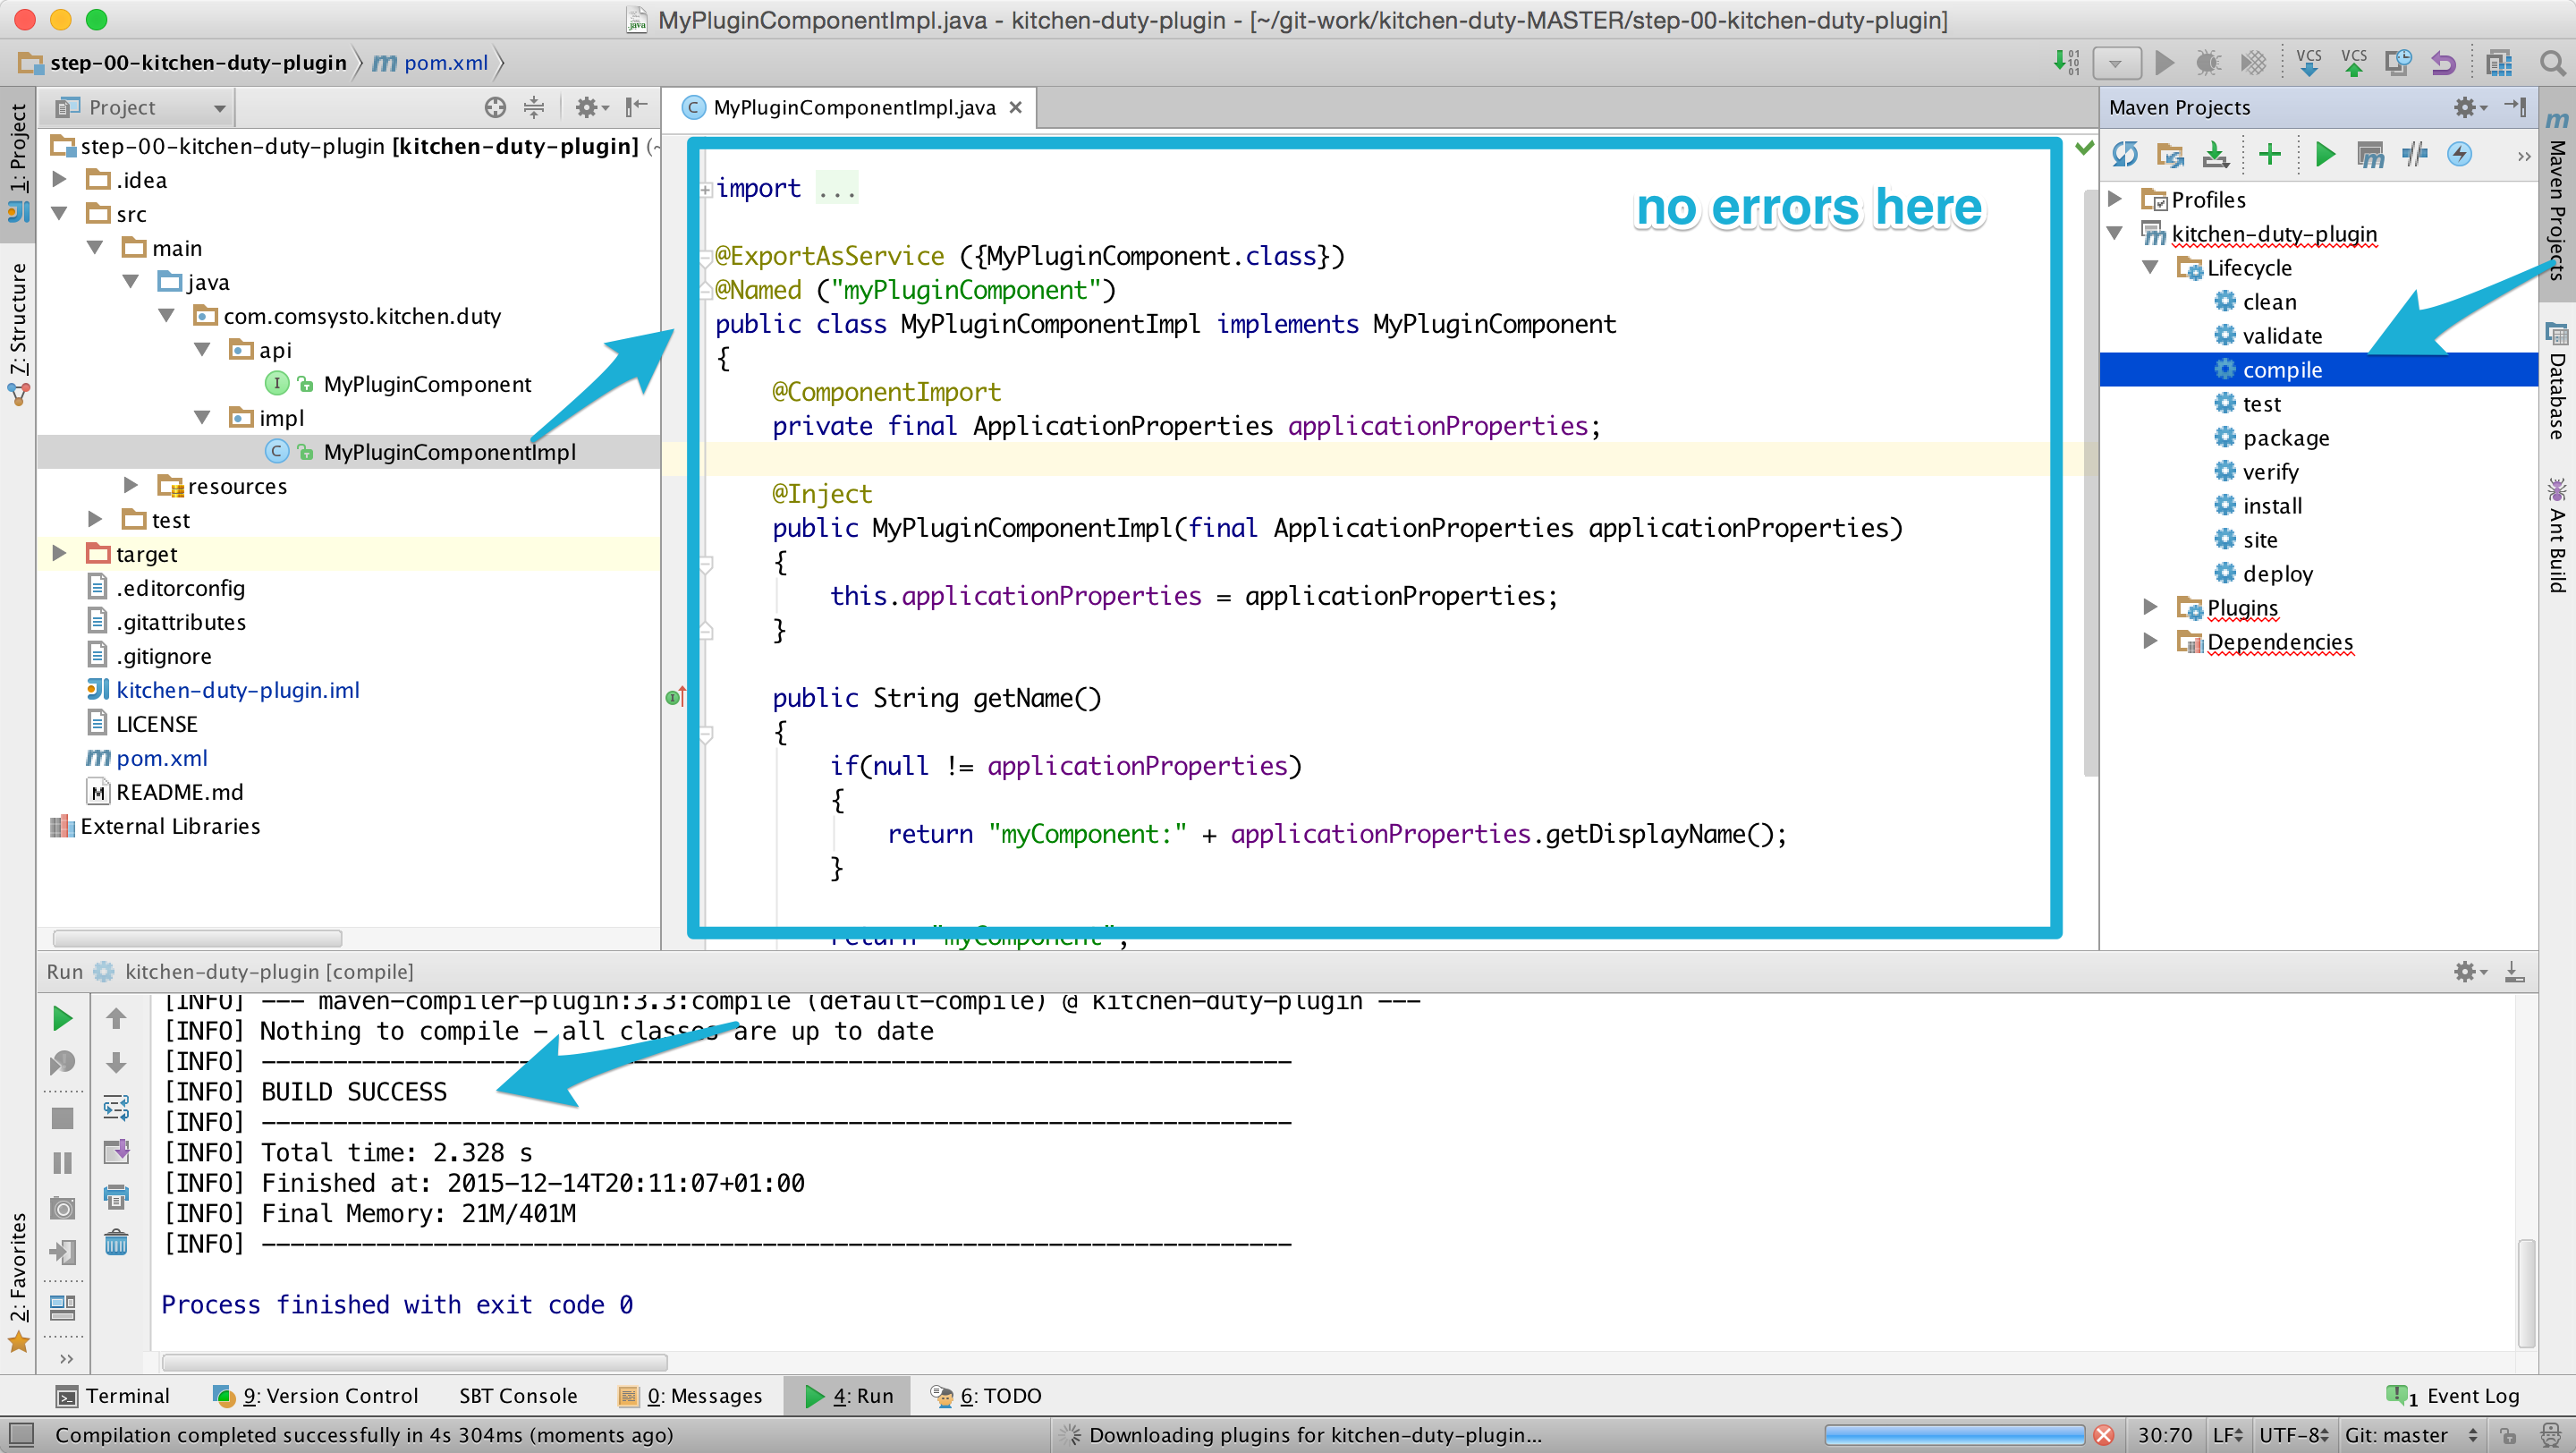
If you do a Build > Make Project now and open the MyPluginComponentImpl.java you should have no errors.
Further Reading: OSGi
You can skip this chapter if you already know OSGi or if you are not interested in the deep internals of imports and exports beetween OSGi modules. The next Step of the tutorial will build on this knowledge.
As you opened MyPluginComponentImpl.java already you might have seen some annotations like @ExportAsService and @ComponentImport.
There is also an important passage of maven-jira-plugin in the pom.xml that contains the following lines.
...
<artifactId>maven-jira-plugin</artifactId>
...
<instructions>
<Atlassian-Plugin-Key>${atlassian.plugin.key}</Atlassian-Plugin-Key>
<Export-Package>
io.codeclou.kitchen.duty.api,
</Export-Package>
<Import-Package>
org.springframework.osgi.*;resolution:="optional",
org.eclipse.gemini.blueprint.*;resolution:="optional",
*
</Import-Package>
<Spring-Context>*</Spring-Context>
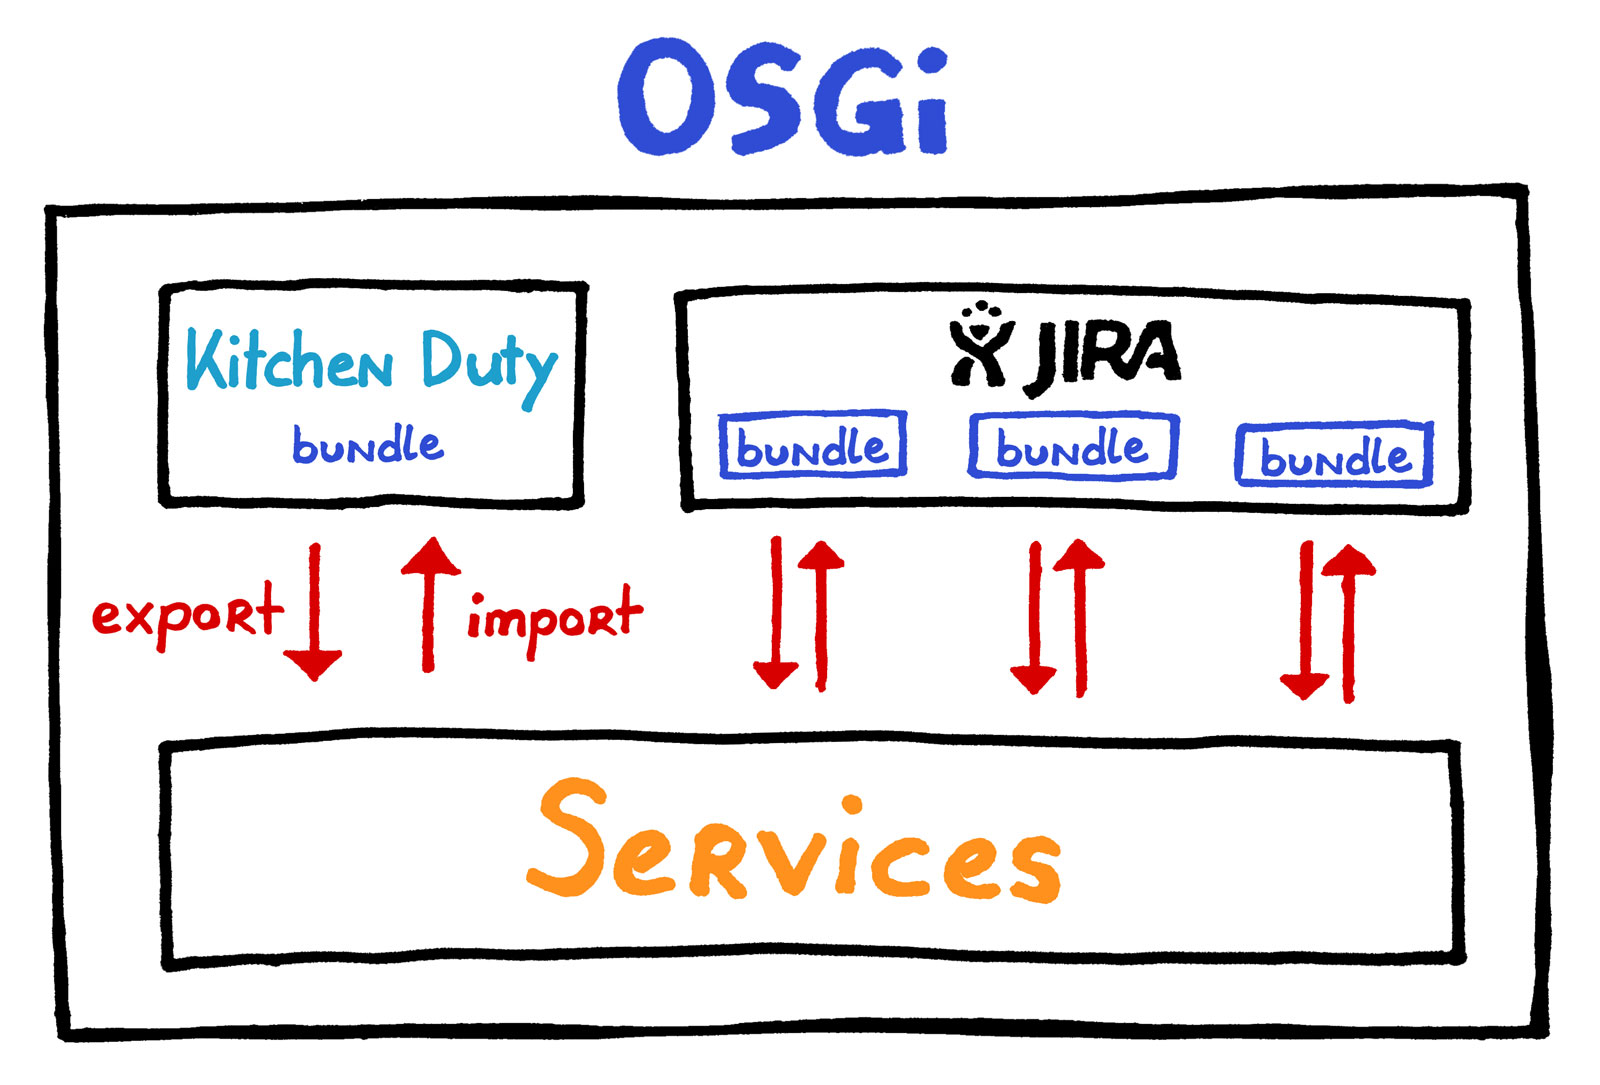
</instructions>We will now dive into unterstanding what all that means. First you should read the Wikipedia Article on OSGi.
Services (OSGi)
Each bundle can publish and find interfaces and therefore use functionality from other bundles. JIRA itself is composed of some OSGi bundles itself. Therefore we need to tell the Atlassian SDK which JIRA interfaces we want to use (the OSGi framework then finds the right bundle for us automatically).
Life-Cycle (OSGi)
We can install, start and stop OSGi bundles during runtime. That means, while JIRA is running our plugin can be installed, started and stopped.
Bundles (OSGi)
Bundles (also called modules) only share Interfaces with other modules. You want to hide your implementation. The Atlassian SDK creates a jar file with
a custom MANIFEST.mf from the Import/Export-Package instructions of pom.xml and the Atlassian Spring Scanner Annotations e.g. @ComponentImport.
We run the package command, so that the jar file is build.
We can now inspect the MANIFEST.mf file (I have shortened it a little).
Manifest-Version: 1.0
Atlassian-Build-Date: 2015-12-15T18:43:43+0100
Atlassian-Plugin-Key: io.codeclou.kitchen-duty-plugin
Bundle-Name: kitchen-duty-plugin
Bundle-SymbolicName: io.codeclou.kitchen-duty-plugin
Bundle-Vendor: codeclou UG
Bundle-Version: 1.0.0.SNAPSHOT
Export-Package: io.codeclou.kitchen.duty.api;version="1.0.0"
Import-Package: org.springframework.osgi.service.exporter.support;resolution:=optional,
org.springframework.osgi.service.importer.support;resolution:=optional,
....
Require-Capability: osgi.ee;filter:="(&(osgi.ee=JavaSE)(version=1.7))"
Spring-Context: *
We see Export-Package and Import-Package statements with the values we expected from pom.xml and Annotations
Summary
@ExportAsService is used to export our interface (e.g. MyPluginComponent.java) so that other OSGi bundles can use it as Spring Bean. Maybe you want to develop a base plugin and use its functionality from a second plugin, then you know now how to do it.
@ComponentImport is used to import functionality from other OSGi bundles Spring Context such as JIRAs ApplicationProperties.
These annotations are used because JIRA uses Spring together with OSGi and these annotations help to make beans available as Spring Beans and to get them from the Spring Context (even if it is a spring context from other bundle).
If we want to do something low-level with OSGi imports and exports we can do that in the pom.xml with <Import-Package> and <Export-Package>
If you want to dive even deeper into OSGi and Atlassian read about Atlassian Spring Scanner, watch the Apache Felix Introduction Video or do the Apache Felix Tutorials.